![]()
![]()
"HOF Fire-Team: Singularis"
Solitaire Rules for HOF Fire Team by Bob Minadeo
Not able to find an opponent or fancy a co-operative battle? Well here's the solution, solitaire rules for HOF Fire Team.
~
Introduction
This variant of Alternative Armies’ “HOF Fire Team” allows you to play any scenario solitaire. These rules may also be used for games where multiple players are on one side while the opposition is handled by the game system. These supplemental rules have been kept very simple and do not require any additional materials for play. All rules from the HOF Fire Team rule book apply except where noted below.
Playing it Single
In short an enemy force will be assigned to one of four positions; Left, Centre, Right, or Reserve. The enemy plans a cunning double envelopment of the player forces using these manoeuvre elements. At game start dice are rolled to see just how far the enemy has already advanced this plan. As play progresses enemy forces move in accordance with this plan unless their discovery of player forces causes a local deviation.
As the HOF Fire Team game is so open ended, and we cannot foresee every possible combination of forces and battle maps, players are hereby authorized to use common sense should oddities arise. For example in assigning enemy forces to positions it wouldn’t make any sense to assign a vehicle team consisting of 4x4 off transport vehicles to a sector composed entirely of enclosed structures. In this case the vehicles should be limited to sectors were driving the 4x4’s about is actually possible! Also bear in mind that it is your game and if you think something should be altered just do it. We won’t come round and knock the dice out of your hands. Promise! Well we can’t speak for that shifty looking geezer in the back. So make that a mostly promise!
The Battle Board
A game of HOF Fire Team may be played on a surface of nearly any size and players should not feel limited by the nine tile layout used for illustration purposes in the book. Having said that I now refer you to the nine tile diagram below.
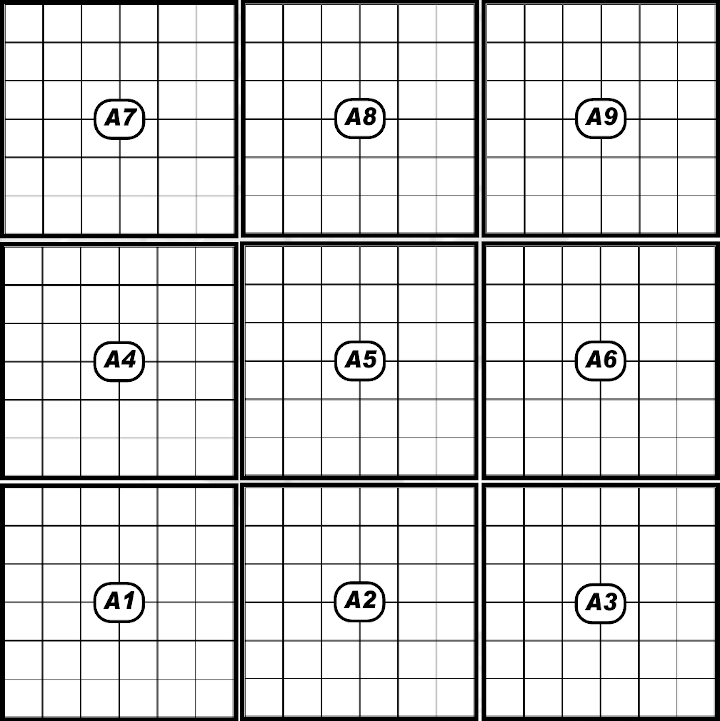
No matter the actual size of your playing area, imagine for enemy planning purposes it is divided into three columns and three rows.
The players (you lot) will enter the table or set up in the lowest row, A1, A2, and A3 in the diagram. Enemy forces will enter by the top row, A7, A8, and A9.
Enemy (the non-player) Teams will each be assigned to a specific column down which they will advance towards your forces. These columns are Right (A7-A4-A1-A2), Centre (A8-A5-A2) and Left (A9-A6-A3-A2). You may have noticed that the two enemy flank columns turn in towards the centre once they reach your set up row. I did tell you the enemy was cunning.
Assign Enemy Teams
Now it’s time to put together an enemy force and determine the part each team will play in the upcoming game. Unfortunately given the variety of settings and forces available in the game we cannot give you very specific instructions on the nature of the enemy force. However here are a few suggestions:
1. Mirror image: Give the enemy an exact duplicate of your force. As your playing skill increases you may want to give the enemy even greater forces than your own.
2. What’s in the cupboard?: Take a look at your figure collection. Pick out a number of figures you like that match, in rough number, the figures being fielded as the player force. Do some off the cuff number crunching to give those figures suitable game values based on their dress and weaponry and off you go.
3. Eenie, Meenie, Meinie, Mo: At some point allot some time to force composition. Group your figure collection into teams for the game and work out stats for each team. Record these teams and stats on a master list. When you fancy a game, select a number of teams from this list at random. Start with equal teams to those you will field and as above increase the enemy forces to increase the challenge level as you progress.
Having determined which and how many enemy teams you will be facing, it is now time to assign them their positions. If you have a particular enemy deployment you wish to try, feel free to skip this next step and just assign the teams to Right, Center, Left, or Reserve as you see fit.
Otherwise start by rolling 1d6 for each team:
1 = Team assigned to the Reserve
2-6 = Roll again
1,2 = Right
3,4 = Center
5,6 = Left
Make a note of which position each team has been assigned.
You will be called upon to roll dice for each enemy position from time to time.
WHEN ROLLING DICE TO DETERMINE THE DEPLOYMENT OR ENTRY OF POSITIONS ONE DICE ROLL APPLIES TO ALL TEAMS ASSIGNED THAT POSITION.
Deployment
Now it’s time to set up the battle board and deploy the teams.
First roll a dice for the enemy Right teams: 1-2 deploy in A4, 3-4 deploy in A7, 5-6 will enter from the top of A7 during play as described below under Off Table Entry. Next roll a dice for the enemy Centre teams: 1-2 deploy in A5, 3-6 deploy in A8. Finally roll a dice for the enemy Left teams: 1-2 deploy in A6, 3-4 deploy in A9, 5-6 will enter from the top of A9 during play as described below under Off Table Entry. The enemy Reserve will always enter using the rules for Off Table Entry. Having determined the disposition of the at start enemy forces, it is now time for play to proceed with your forces entering play along the bottom sections A1, A2, and A3. Enemy forces will act according to the guidelines under Enemy Actions below.
Off Table Forces
At this point, certainly the enemy Reserve, as well as possibly his Right, and Left, have been kept off the board. These forces may enter play as the result of dice rolled at the end of each turn. After each on board team of both sides has had a chance to activate and completed their turn, roll a dice for each off table force. On a result of 5 or 6 that force will enter play during the activation phase at the start of the following turn. Right position forces will always enter play from the top of A7. Left position forces will always enter play from the top of A9. Roll a dice to determine the entry point of Reserve position forces; 1-2 = top of A7, 3-4 = top of A8, 5-6 = top of A9.
Enemy Actions
Now you know if and where the enemy teams start play. Here is what each team will do when activated. When activated an enemy Fire, Support, or Vehicle team will do the following in this order:
1. If an enemy team is in LOS and in weapons range, move so that the majority of the team has cover or an IP.
2. If as above, and the acting team already has the majority of its figures in cover or an IP, then fire at the closed visible enemy.
3. If the acting team has no enemy within weapons range then it will move as follows, trying to end each move with the majority of its team members in cover:
a. Right teams move from A7 towards A4 towards A1 towards A2 where it becomes a Centre team.
b. Center trams move from A8 towards A5 towards A2. On reaching A2 move towards the closest known enemy and eliminate it.
c. Left teams move from A9 towards A6 towards A3 towards A2 where it becomes a Centre team.
d. Reserve teams move as a Right team if they entered play from A7, Centre team if they entered from A8, or Left team if they entered from A9.
Command teams will act as the other teams with these exceptions:
1. If air or artillery strikes are available and the enemy is in LOS, call in the strike on a roll of 1-3. Subtract one from the dice if an enemy vehicle or more than four enemy soldiers occupy the board to be targeted.
2. If a friendly team in the same position needs rallying, on a dice roll of 1-3 do so.
3. If no enemy is in LOS and/or the Command team is in cover, detach a Medic if one is available. Once detached the Medic will move to the nearest casualty and treat it, and then on to the next and so on.
4. If no enemy is in LOS and/or the Command team is in cover, call in a Medivac if one is available and required.
Waypoints
As you may have noticed by now the non player does not use Waypoints in quite the same way as a human player would. We took this approach with the notion that when playing a human player you would not necessarily know which waypoints were assigned to each enemy team. You have already seen how non player teams follow a set of instructions based on their assigned position. Here you will learn how they might possibly react to enemy sightings and movement.
Whenever a non-player team first has a new player side team in LOS and not in the non-player teams column/position, and each time a non-player teams is fired on by such a player team, roll one dice and compare it to the non player team’s Personal Comms value. If the roll is equal to or less than the teams PComms, roll a dice. On a 1-3 it will now treat the enemy that caused the test as its new waypoint. If and when the non player team moves it will move towards the player team until it or the player team are destroyed or routed. If it is the player team that was destroyed or routed the non player team will now act as a member of it current position.
That is to say if a left position team moved from say A6 to A5 and destroyed the player team, the non player team is now treated as if a Centre position team.
The Unforeseen
As noted in the beginning of this article, this supplement is intended to be a simple means of running solitaire or same side games. As such rather than trying to write rules to cover every possible combination of forces and events we have opted to set down a series of guidelines to get your games off and running. If ever a situation crops up such that you are unsure of how to handle it, either choose the resolution you think most likely or simply narrow the choices down by a series of yes/no questions and roll dice. 1-3 = yes while 4-6 = no.
For example, say a Terran Defence Force Grav tank has “changed its waypoint” and is heading for an enemy team in a building. The Grav tank has destroyed its target and by a strict reading of the instructions above it should now smash into the building to occupy the position of the former enemy team. Should it really? You could simply decide yes or no as you see fit or roll the dice: 1-3 it should, 4-6 it shouldn’t. Say it shouldn’t, should it follow its previous position orders? 1-3 it should, 4-6 it shouldn’t, and so on until you reach a resolution you are content with.
Well that’s all there is to it really. We do hope you enjoy using these rules and encourage you to expand on them as you like!
Behind The Scenes
The challenge of any solitaire design is to create an illusion of intelligence for the non-player while not overburdening the human player with activities that take one out of the "moment". By that I mean limiting the amount of mechanics that the player has to think about, so he or she can concentrate on tactics in the game's reality.
For a close-in skirmish game like Firefight 2.0 it is enough to have non-player forces react to player forces with a few random events thrown in to add some surprises. This was easily accomplished with a simple deck of cards, as can be seen here on Orcs in the Webbe.
HOF Fire Team plays at one level higher in the scheme of things and so required something a little different. Here the approach to contact can be as important, and certainly needs to be better planned, than the actual combats that occur when the enemy has been contacted.
To that end, I decided upon a set enemy plan (double envelopment or Horns of the Buffalo). with a random allocation of enemy forces. This front loads the player's work load. The enemy force must be created and assigned a role. After that it will "follow the script". In order to add some variation though, the allocation of forces is random but weighted. It is most likely going to be a double envelopment but it could easily end up a right or left flanking move or a straight down the middle assault. A further random element was added in by using variation in just how well developed the non-player's plan is when the player's forces enter the game.
Finally, one of my design goals in HOF Fire Team was to depict how technological disparity affects battlefield performance, and not just in terms of firepower. The Waypoint system forces lower tech teams to adhere to a preconceived plan while higher tech forces are able to use communications technology to react on the fly to battlefield situations. For the solitaire rules I've added a simple test to see if the non-player is able to react to player actions. However without a further component it becomes all too easy to force the non-player to react and worse yet, the higher the non-player tech level, the easier it is to do so. To compensate for this if a non-player force CAN react to a player move, a second dice roll determines if it will.
Hopefully the combination of simple mechanics (only single rolls of six sided dice when needed), a variable yet oh so cunning enemy plan, and the ability of the non-player force to react to player actions will provide a satisfying solo or same-side game experience. And as always, and this cannot be stressed enough, with any set of rules, if a player feels changing something would make for a better game, AND if all other players agree with trying it out, by all means make the change. Games are for players to enjoy!
Bob Minadeo
Author of HOF: Fire Team
July 2012
~
Webmaster's Notes
This article was originally published on Alternative Armies' content portal Barking Irons Online on Friday 20th July 2012 and is reproduced here with permission.
Barking Irons Online was Alternative Armies' official content portal that I ran for them from 2011 until 2013, You can find (almost) all of the content it hosted on Orcs in the Webbe in the respective categories in the menus or browse through it all by clicking on the maroon "Barking Irons" tag below.
~