![]() "The Hit"
"The Hit"
Pacification Arc - Mission 8
A Firefight 2.0 scenario for two players by Greg Rumbles.
The fight for Coggshall's city district, Zone 5, is nearly over. The Yordist insurgents have mostly been cleared but still they remain a threat to the rest of Bosworth IV. It's time to cut the head off the snake.
~
The Lothian Tocs Borderer company banner had its tails cut off by her Magnificence the Baroness Margrette and the bonnie lasses latest consort, Duke Ramsey, in front of the morning departure formation. War wet all of her appetites it seemed, as she went through so many consorts of late. Most of these ended up fighting in some of the fiercest parts of the front… and were soon killed in battle. The men were beginning to call her ‘The Black Widow’, so thought the newly raised Banneret, Laird Sir Samuel Rumbles, as he stood proudly in front of his mercenary company of Tocs Borderers.
They had come to the end of their first Canlastrian contract within Coggshall’s dreaded city district, known as ‘Zone 5’. It was finally clear of Yordist insurgents and the semblance of normal life had been restored to the area’s inhabitants. The formidable deed was not without cost, as the row of dented helmets set atop torn body armour attested mutely. The Lord Knight thought back upon the last mission of his unit’s cruise of duty in the dank slums of Coggshall. Enough was enough! The leader of the Yordist insurgents in Zone 5 was one Sir Reginald Oxford, a Retained Knight from Yordan III. He was responsible for the deaths of many innocent Yordist civilians, as well as scores of Canlastrian soldiers. He must be found and put down. He would be, and this muck of his making tidied up once and for all! This man had led hit teams against the Tocs Borderer’s headquarters and even one of Laird Rumbles’ Knights. That warranted Sam’s undivided attention!
Sam selected his post of Retained men carefully for this mission, handpicking them from the best of the best. All four of them were Retained Knights, Sam and his Lieutenants. They called themselves ‘The Four Horsemen’ for they vowed to bring the apocalypse to the remaining Yordist in the city. They would cut off the snake’s head!
Now, the four sat silently covering a road which was the subject of much intelligence section speculation. Local spies had sent warning that Oxford and what was left of his Yordist band would march to support a highly rumoured Yordist airborne landing assault against Coggshall, it was said this strike might even drive the Canlastrian garrison from the badly battered city. What no-one knew, or even suspected, was that Sir Sam himself was responsible for planting this false intelligence! His comm’s techs had filled the air with static and false Yordist radio traffic, completely choking off the air waves to Oxford and his men. The question was would the ruse work to flush the despised Yordist commander from his hole and into Sam’s sights?
They were about to find out.
The Mission and Its Aims
A copy of IAG001 Firefight 2.0 Killing Streets for the Firefight rules is necessary to play this mission. Also required are Ion Age miniatures to represent two squads of Muster troops and two squads of Retained.
This mission is for two players.
The First Player has a Canlastrian Retained post.
The Second player commands a Retained Yordist Post and two squads of Yordist Muster troops. The mission objective for the Canlastrian Tocs player is simple, hide, watch, and wait for a shot at the insurgent Yordist Commander. Kill him and they can scamper off and the rest of the left behind Yordist men in Coggshall would likely lose heart and surrender or go home.
The objective of this mission for the Yordist is to march along the road from the Western end of the battlefield to the Southern edge. They follow Sir Reginald Oxford, a harsh, cruel, yet charismatic man who is said to be able to mesmerize lesser men with a mere stern gaze. Those who remained would follow him anywhere. Sir Oxford was the heart of their mission. And they marched to his beat. Should the Canlastrian’s put a bullet into that heart, the Yordist shall seek out the men who pulled the trigger in one last act of dire vengeance before dispersing from the damned city to escape the rat war which they had waged so well.
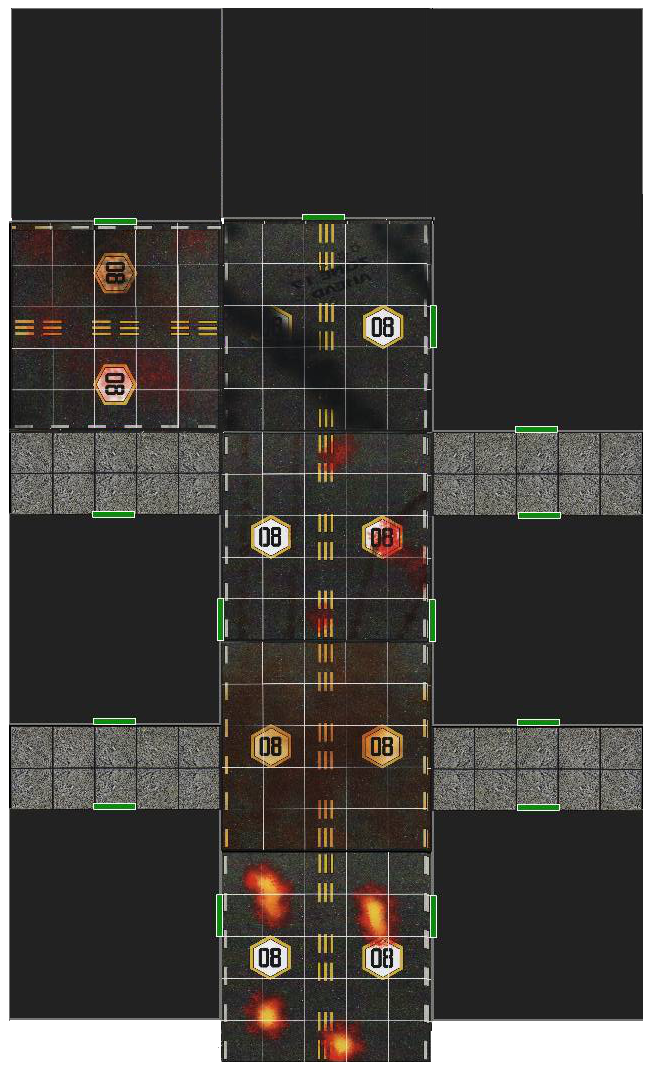
Creating the Playing Area
Create the map as shown in the illustration below. Then place 2 debris markers randomly on each street board (use 1D6 x 1D6 to determine which square, if you roll a six then roll twice again.
Player One – Sir Samuel Rumbles, Mercenary Retained Knight and Captain of the Lothian Tocs Borderers, Canlastrian Army
You have a 158 point veteran squad of Retained troops. One veteran Retained Household Errant Knight (Sam) with an Angis 12.5mm Automatic Rifle, an Octa Sword, a Hobbes Bomb and a Smoke Grenade. He is accompanied by three veteran Retained Household Knights, each armed with Angis Automatic Rifles and a Hobbes Bomb. You must have four characters. All of your characters must be armed with projectile (P) and assault (A) weapons. Remember to apply veteran stat increase and additional skill to each character.
Your Canlastrian Tocs Retained are deployed hidden in any buildings or debris. Mark clearly on a piece of paper the exact position of each figure. They will patiently wait unmoving for their target. They cannot be detected before they have fired; they are expertly hidden and are using field dampening technology to hide their signatures. When they think they have the kill shot, each soldier is placed on the board and can fire once. This can be at any time, it interrupts the Yordist's players 'pre game' move. Then gameplay continues as normal. Once the shots have been taken the game begins and you must then evade the Yordist forces and escape off the battlefield without being killed.
There are no options for this squad.
Player Two – Retained Household Knight, Sir Reginald Oxford of Yordan III, Yordist Army
You have a 124 point elite Post of Retained troops. One HW Knight with a Minstrel Taser (Oxford), one Retained Household Medic with a Tumbler MkIII SMG, and two Heavy Weapons Varlets, armed with a Moth Type XII Rocket Launcher and only 12 points worth of 50mm rounds, the loader also packs a Tumbler Mk III MPI. You must have four Retained characters. Three of your characters must be armed with projectile (P) weapons and the Knight with an energy (E) weapon. The two knights each carry one Hobbes Bomb.
You also have two 65 point squads of Mustermen, each containing an Emeritas (Tom Thorn and Ian James) with a Moth Type VI 9mm Automatic Rifle, and three infantry, also with Moth Type VI 9mm Automatic Rifles. One character in each squad may have a Hobbes Bomb.
Place your men in column on the North-western edge of the road. On each 'pre game' turn, your force will move in a long march column of twos along each side of the road, heading southward down the street to the bend in the road and make the turn. No roll is needed, everyone moves five squares at a time. Your forces have fallen for the ruse and may do nothing but move, keeping formation, until the dreaded shots ring out. Once they have fired treat the game as having just started and continue with gameplay as normal. Your objective is to prevent the assassins from escaping!
There are no options for these squads or the post.
Special Rules and Conditions
The game will last until either side has completed their objective.
There are two special rules in use for this mission. Please read and apply them in your playing of Firefight for this mission.
1. Hidden Deployment - As per the rules above, the Canlastrian's start play hidden from view.
2. Buildings – The ‘off-board’ sections (shown as grey squares on the map) are considered to be buildings. The central square of each building which faces an alleyway or a road are considered normal entrances (doors) into the building. On the accompanying map these entrances are shown, marked by green squares. It costs two general dice to move through a door. Walls block standard line of sight, however, any figure inside the buildings adjacent to the wall may fire at figures outside at no penalty, representing windows or access hatches granting them LOS to the street. These figures, whilst adjacent to the wall, can in turn be targeted by those outside. They are treated as being in Hard Cover. There are no exits other than those marked.
Expanding the Mission
This mission is part of the Firefight 2.0 Pacification Mission Arc, set after the fall of Bosworth IV, and should be played with other missions in Arc in the correct order.
Designer’s Notes
This mission is the eighth of a series of missions in a Firefight 2.0 Campaign Arc which is meant to show the difficulties faced by an occupying force in a built up area in time of war. I have drawn upon the reports of recent military experiences in the modern age and have applied them to this mission arc. When the players have finished all of the missions, it is my hope they will be enlightened to the truly difficult job military personnel have when forced by circumstance and orders to occupy and garrison a city in a foreign land.
The mission introduces the concept of military intelligence, something the uninitiated sometimes call an ‘oxymoron’. The effects of intelligence, and indeed, counter intelligence, when combined with electronic warfare and black operations such as assassination missions like sniping are truly awesome in scope and can and do either grant victory or inflict crushing defeats through small surgical strikes such as this mission portrays.
~
Webmaster's Notes
This article was originally published on Barking Irons Online and is reproduced here with permission.
~