![]()
"International Demonstration Kit"
An Introduction to Flintloque: The Skirmish by Mike Roberts*
One of the most sought after supplements for classic Flintloque has been scanned, OCR'd and converted into a PDF and is now online!
Merry Cryptmas!
~
Editor's Introduction
The Flintloque International Demonstration Kit was a thing of wonder.
To draw new players into the fold in the nineties you could send details of your gaming club to Alternative Armies and in return they would send out this pack. All the miniatures you needed along with a copy of the rules and two scenarios with seperate briefings for all players. No GM was needed, you could just crack on and enjoy Flintloque: The Skirmish. It's a holy grail for many so I decided why not brighten up this horrid year by scanning it in and releasing it as part of the Advent Calendar.
One small caveat, I am missing a couple of things. The main one is the three printed A3 map sheets for Scenario 1. They don't really affect gameplay as you can simply setup your tabletop to represent a Peninsular crossroads using whatever scenery you have. Also I've had so many mailings from AA over the years I'm not sure which posters and leaflets go with this, again they're not required but if I do find out which are which I'll upload them too.
I've not transcribed all of the rules into the web version of the article that you can see below, just the introduction, scenarios, briefings etc. The PDF is complete though with everything you need to play Flintloque, albeit an older edition. One thing, as it says in the original DO NOT READ the briefings. Hand them out to players secretly, it's much more fun that way. Keep the Flag Flying!
Craig Andrews
December 2020
~
To download a PDF (~25mb) of the original booklet produced by Alternative Armies in the nineties click here or on the icon below.
![]()
~
Introduction
Welcome to the World of Valon and the Flintloque International Demonstration Kit! In a short while, you will be fighting exciting tabletop battles with a simple set of fast-play Skirmish Rules that allow you to decide the fortunes of war yourself. This pack includes all you need to get started, with basic rules, miniatures, dice and paraphanalia to support your campaign such as posters and leaflets. Your International Demonstration Kit should include the following:
- 16-slot Polystyrene tray
- 14 Flintloque pewter miniatures on 25mm square bases
- This Booklet (International Demonstration Booklet)
- Map for Scenario One - 3 A3 Sheets
- 4 Dice (2 x d10, 2 x d100)
- 2 Posters to advertise your Demonstration Games
- Flintloque Leaflets
- Flintloque Catalogues
~
About Flintloque: The Skirmish
This pack is designed to demonstrate the mechanics, ease of playability and fun aspects of the Flintloque Skirmish gaming system. Skirmish fantasy gaming involves individual miniatures representing a character that has unique skills, movement rates and abilities. Instead of faceless hordes of anonymous soldiers, you now command troops with their own personalities and talents. War just got personal!
The rules contained herein are a simplified version of the main Flintloque rules that can be found on our Website at http: //www.alternative-armies.com . They are quick to learn and after a brief read through them you should be ready to decide the fate of Valon yourself!
A painting guide is included to give you an idea of how the miniatures should look. The uniforms and history are based loosely on those of the Napoleonic wars, which makes the miniatures very colourful and a joy to paint. However, feel free to make up your own colour themes. After all, this is fantasy!
You might need to photocopy some pages of this booklet for use in your games . There are four Character Sheets that include information about the soldiers you'll be commanding, and it's very useful to have these close to hand when playing a game. Two sheets of fast-play rules have been provided to allow easy reference to the Basic elements of the game, but you'll need to read through the Rules Section in this booklet before you can make best use of them. Best of luck with your dice, and have fun!
~
The World of Valon
Valon is a world inhabited by a variety of creatures including Orcs, Elves, Dwarves, Ogres, Dogs, Goblins, and sinister Undead, all immersed in a bitter war. The old order has been ripped down and crushed beneath the iron heel of the Elven Emperor Mordred, who overthrew his mother, the Empress Morgana, and took her place as ruler of the Elven homeland, Armorica. With the fall of Morgana, Mordred's Ferach Armee helped him steal her Power Ring, which enabled him to manipulate the very fabric of Valon's reality.
Prior to Mordred's revolution Valon was bathed in the aura of Wylde Magick, a supernatural force harnessed by magicians and sorcerers to perform wondrous feats of fabulous proportions. But Mordred had other plans for the future of Valon. Under the influence of his patron God, BuonPartee, he learnt much about the potential of the Power Ring and how to break the Law of Wylde Magick. His desire for knowledge had one goal: a new Elven Empire torn from Valon by the power of Black Powder. Mordred annulled the Law of Wylde Magick and his armourers forged new weapons. Known as Flintloques or Muskets, they fired lethal leaden balls. Weaponry like this was not possessed by any other race on Valon, and with these terrible devices his trained colunms marched against the rest of the world and turned the earth red with blood.
Few could stand against him.
Morgana fled to seek haven with the Dwarves of Krautia, who granted her sanctuary in return for the secrets of Black Powder weapons; secrets which soon filtered into the hands of Valon's other races. Determined to punish his mother's allies, Mordred marched through the lands of the Dark Elves in order to attack the Krautians. Massacring not only the Dark Elf military forces but civilians too, the Ferach quickly conquered the realm of Northern Catalucia, which took them right to the border with the Dwarves.
However, when Mordred's Ferach forces threatened the Dwarves, many of them decided to side with him. They formed the Confederation of Finklestein in opposition to the rest of their kin in the Krautian League. With the Confederation Dwarves came the Ogres and Dogs who bordered their lands. A bitter struggle erupted between Mordred's allies and the Krautians under their Kaiser, Artur, whom they elevated to the status of a God.
This was just the beginning. The surviving Dark Elves and their King, Fernando, fled across the sea to Southern Catalucia, the only remaining Dark Elf territory still free. Mordred ruthlessly pursued them, and launched a full-scale invasion. Once again, he met with considerable success, and only the timely intervention of the deadly Orcs of Albion and their Goblin allies saved the Dark Elves. The Orcs, under their Commander the Duke of Wheeling-Turn, halted Mordred's forces and began to turn the tide of his seemingly inevitable victory. Their "thin red line" held out against wave after wave of Ferach troops, and the conflict ground to a bitter stalemate.
Soon Mordred was conducting a war on two fronts: against the Dwarves in Krautia and the Orcs, Goblins and the deadly Dark Elf Guerrilla fighters in Catalucia.
This did not prevent him from opening up a third theatre of blood as he invaded the frozen realms of the Witchlands, the domain of the Star Wraith Aleksander and his lJndead minions. However, this campaign proved disastrous, and thousands lost their lives in the debacle that saw Mordred's Grande Armee du Norde, the largest invasion force ever assembled in Valon, reduced to a few thousand.
The war still continues on all fronts, Hotly pursued by the Star Wraith's legions, many Elves and their allies still fight the Undead, searching for a way out of the Witchlands nightmare. The war with Krautia is at a stalemate; with neither side being able to deal a telling blow to their enemy. In Catalucia, the struggle continues, as the Orcs and Goblins, aided now by Dwarves and Ogres from Krautia, still try to liberate the Dark Elves from Mordred's rule.
Death, destruction, and lives destroyed by the power of Black Powder weapons: this is the World of Valon.
~
Playing Flintloque
Before staging your demonstration game you'II need to paint your mininatures. As already mentioned we have included a painting guide to make things easier. Once they're painted up, the next step is to find a suitable playing surface to use as a battleground.
If you're a member of a club, you should be fortunate enough to have access to gaming tables and the like. One advantage ofFlintloque is that it does not require a huge playing area. The actual size of the table is not too important, and you should use the maps included in this booklet to give you an idea of the dimensions of your playing surface. The maps depict the lie of the land, and show you where your troops start from and any other important features, such as bridges, woods and rivers. These are called terrain features and are usually best represented by some form of model scenery.
Before your players arrive, ensure that there are paper and pencils to hand as you'II need them through the course of the game to make a note of what each of your characters are doing. Don't worry, there isn't much to note down and it won't slow the game down at all. After a few games you may not need to make as many notes as you become more familiar with the system, but for the first few games it is recommended that you do.
All measurements for weapon ranges and movement are in centimetres, so you'll need a tape measure at hand. It may be a good idea to have a tape measure for each player to hand, as itspeeds up play. The only other thing you need are the rules of the game, and you're ready to to play. It is very important that your ead through the rules and have a few games to get the feel of things prior to staging a demonstration game, so that you can sort out any queries or problems beforehand.
~
Terms and Definitions
You can read these sections in full by ckicking on the PDF link above, pages 7 and 8 - Craig
~
Rules
You can read the rules in full by ckicking on the PDF link above, pages 9 through 18. - Craig
~
The Scenarios
The International Demonstration Kit includes two Scenarios for you to play. The first centres around the body of a dead Dwarf (see the enclosed miniature) who everybody is trying to get hold of. The second has some very unusual mission objectives, which encourages some very childish behaviour! However, before we look at them, a word about the Scenarios in general and the Character Sheets for each side.
Each race (Orcs, Elves, Dwarves and the Ogre) have different statistics, skills and equipment. They also have different agendas for each Scenario. Players can choose to either go it alone or make a quick pact of mutual assistance with a fellow, but all should be beware, as there is nothing stopping a player from changing his allegience without warning!
The Character Sheets contain Mission Briefings, which give the objectives of each side in the Scenario. The other side shouldn't know what your mission is about, as they may try to stop you from achieving it. The Mission Briefings are intended to complement the Scenario Backgrounds, which give a brief outlineof what everybody knows. The Scenario Backgrounds include a map and any special rules needed to play the Scenario.
To save you referring to the main rules section in this booklet, two sheets of fast-play rules have been included, which provide any information you may need for quick reference such as modifiers, etc.Once you are familiar with the main rules, this fast play sheet can help to refresh you on anything you'veforgotten . If you do get stuck though, refer back to the main rules.
So this is Flintloque! Enjoy the Scenarios, whichever side you choose, and Good Luck!
Scenario One
The Dwarves are in something of a panic. Your scouts have reported frantic Krautian activity near a crossroads in you vicinity, and you've decided to check it out to see what all the fuss is about. It is rumoured that the Dwarf is carrying some important documents, and that the Krautians are desperate to get them back. Each side has headed to the crossroads in an attempt to recover the body of the Dwarf and the documents he carries.
To play Scenario One, you'll need the dead Dwarf model. Maps have been provided: set up with the dead Dwarf at the middle of the crossroads and each player in their respective area on the map. Whoever has the dead Dwarf must exit the map from the opposite side to which they began.
Special Rules - As neither side wants to hang around searching the body on the battlefield (after all, who knows where the Dwarf concealed the documents), you have to carry the Dwarf off the table. You must exit as shown on the map. To pick up the body of the dead Dwarf takes a whole stationary Turn next to his body. Moving with him results in a single left column shift to movement, and also prohibits the Characters from firing any Black Powder weapons. If the Character carrying the Dwarf is engaged in hand-to-hand combat, they suffer a -4 penalty to their roll. If wounded in Melee or by Black Powder weapons, the Character carrying the Dwarf drops the body.
As mentioned in my introduction I do not have the original maps any longer. I'd simply set up your tabletop to represent a crossroads in Catalucia with some buildings, scrub, hills, rivers etc as per your terrain. Place the Dwarf in the centre on the crossroads and dice randomly for a board edge to place your troops. - Craig
Scenario Two
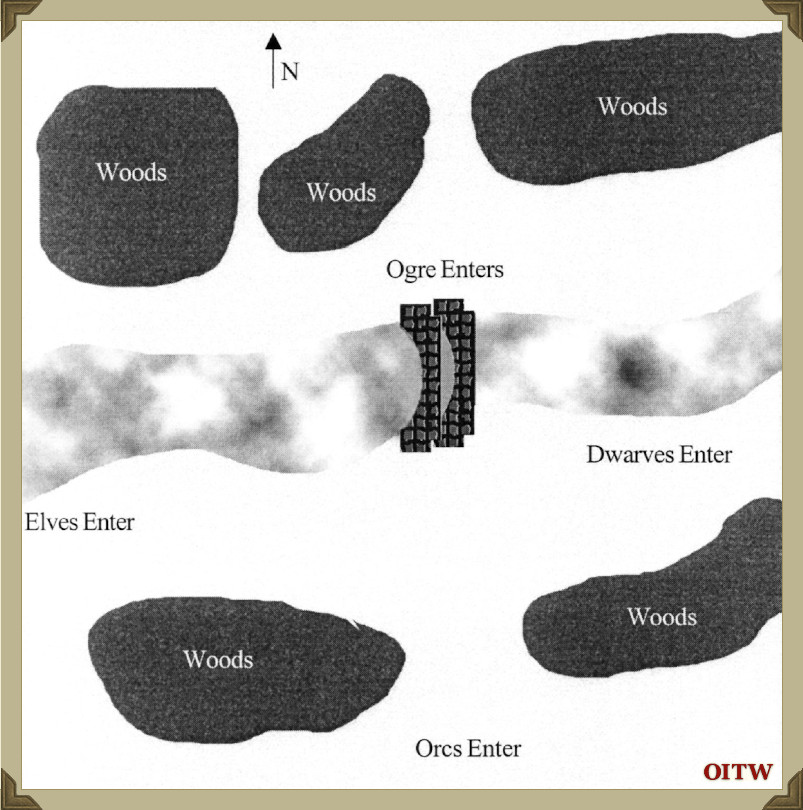
Set up the terrain according to the map below. The river should be 10cm across, and there should be only one bridge across it, 10cm wide. The river gives two left-column shifts on the movement table for Characters who try to cross it. The trees count as Light Woodland for the purpose of firing and movement.
As the Mission Objectives for this Scenario are ultra-secret, the set-up information is all that you get...
~
The Character Briefs
The full pages including stats can be found in the PDF linked above, pages 21 to 28. - Craig
~
DO NOT READ THESE IF YOU INTEND TO PLAY THE SCENARIO
IT WILL SPOIL YOUR FUN I ASSURE YOU
- Craig
~
Player One - The Orcs
You are Colonel Oswold Pebblekettle, Colonel of the famed 105th Albion Rifles. The best Light Infantry troops in Valon, the Rifles are both feared and respected by the Elves of Mordred's Armee. Dressed in unique green uniforms and armed with Albion's deadly Bakur Rifle, they perform their role as skirmishers with outstanding courage and skill. For the Scenarios that follow, you have three Rifle Orcs under your command, all new recruits that only recently finished their extensive training. RifleOrcs Noaks, Pervis and Singleturn are all eager to get to grips with the Elves and prove their worth to you, perhaps hoping to become as renowned as their hero, Lieutenant Sharke.
Your part in the missions that follow is to ensure that your troops perform to the best of their ability. You are an Experienced RifleOrc, and must see to it that your Orcs survive these missions. After all, the experience they're due will be of no use to them if they are dead. You know that if you are badly wounded or killed, they'll lose heart and run, so your own safety is of paramount importance too.
You have one slight quirk: you have a terrible fear of water. Whatever you do, you must avoid it at all costs. To ensure that you stay as dry as a bone, you carry an umbrella at all times. You don't use this as a weapon, even though you're sometimes tempted, because if it gets damaged, you'd get an awful soaking next time it rains.
As well as carrying an umbrella for personal protection against the elemental enemy, you have a sword for killing foes of the Ferach kind. All your troops carry the superb Bakur Rifle, one of the most accurate Black Powder weapons on Valon.
Mission Briefing One: You've heard that the Krautians have lost a very important set of documents,and they are desperate to find them. Normally, you would rush to their aid, but you are somewhat suspiscious, as you would have expected them to ask for your help in retrieving them, but they haven't. It is quite possible that the Dwarves are traitors to the Krautian League, and are carrying the documents to give to your enemies. For this reason, you have decided to recover them yourself, and have a look at them. To succeed in your mission, you must retrieve the body of the dead Dwarf from the field of battle.
Mission Briefing Two: Your troops, having finished their training, need to return to their own lines, but have been cut off by some Elves. Much to your chagrin, the only way out of the situation is acros the River Sticks, and you are terrified of water. All you have to do is exit with at least one of your soldiers off the northern edge of the table to claim victory. However, if you get wet, then you have lost it all... If Oswold gets wet, he is removed from play, as he'll be too busy drying himself to do anything else.
~
Player Two - The Elves
You are Captain Junot Saquais of the 1 er Velite Grenadiers de la Garde Mordred. You are in charge of a small group ofVoltiguers, specially trained Light Infantry from the ordinary Line Regiments who operate as skirmishers. You are currently training them to see if they've got what it takes to join the Garde which has its own Light Infantry. All these troops have been hand-picked to accompany you on these missions so that you can assess their skills. If they are lucky, they too may join Mordred's elite. They still need some training however, and have not acheived the elite status they crave as yet. However, with a little more time, who knows what they will be capable of.
There are four Privates and an Officer under your command. The Privates (Soutie, Sweepe, Soue and L'Escampe) are armed with the excellent Ferach Musket, which gives even the Orc Bakur Rifle a run for its money in terms of accuracy. The Officer, Lieutenant Corbette, is armed with a Ferach Pistol and a sword; while you yourself carry a Ferach Musket and a lethal axe, which certainly lets you cut your enemies down to size.
Mission Briefing One: You've heard that the Krautians have lost a very important set of documents, and they are desperate to find them. One of your soldiers spotted a Dwarf running through a crossroads, and shot him. The soldier, Private Soutie, failed to realise the significance of his victim, and returned to your Unit blissfully unaware that he had stumbled across the courier. When he told you what had happened, you realised immediatly that the dead Dwarf must be the one that they are looking for. If you managed to reclaim the documents, it would greatly enhance your prestige in the Garde, and for this reason, you've decided to take the body back tobase for a closer inspection. Your objective is to leave the table with the body of the dead Dwarf.
Mission Briefing Two: Your troops, having finished their training, need to return to their own lines, but have been tempted by one final chance for glory. The esteemed Ore Rifle Colonel, Oswold Pebblekettle, is in the area, and he is trying to return to base. You've heard that he is terrified of water, and have decided to humiliate this hero of Albion by throwing him in the River Sticks, which he must cross to return to base. He could probably do with a wash anyway ... To throw Oswald in the river, you must win a round of Melee combat against him. If you succeed (and he is still alive) you may pick him up next Turn (even if he is forced to move as a result of a Morale Check - you get to grab him first) and carry him towards the river. He may do nothing until the Melee Phase, when he may try and struggle free. If he wins the combat, you've lost him and he is free next Turn. If you win, you keep hold of him. To throw him in the river, you must be holding him within 5cm of the water's edge. Once you are this close, there is nothing he can do, and you may throw him in during the Melee phase of the Turn you get to the water. Oswald is quite heavy, and inflicts a left column shift to his bearer's movement. The Orcs may not fire at the Character carrying Oswold, but if the Character is injured or forced to move as are sult of a Morale Check, then he drops Oswold. The Character may not fire while carrying Oswald, and is at -4 if engaged in Melee combat with anyone except Oswald while carrying him
~
Player Three - The Dwarves
You are Sergeant "Schnapps" Schneider, an elite Krautian Scout. Originally, there were three of you in the detatchment you command, and your trio was supposed to carry some important documents to another contactin the area. One of the soldiers, Hakenan, went missing after a serious drinking session, and neither you or your remaining colleague, Private Schumaker, know what has become of him.
However, what you are certain of is that he has got the documents. One of your favourite activities is gambling, and while bragging about your skills and general state of alertness, you made a bet with Hakenan that he couldn't steal the documents from you and meet up with the contact himself. Clearly, your senses aren't as fine as you thought, and he has made off with them. You must find him and recover the orders as a matter of urgency, as you don't fancy explaining this one to Krautian High Command...
Both you and Schumaker are members of an elite Section, and are armed with knives and Dwarf Jager Rifles. You've heard that there are a large group of Elves nearby, so expect some trouble.
Mission Briefing One: Oops! Hakenan has gone missing, and you've just spotted his body by a crossroads! Unfortunately, there are a whole bunch of other troops approaching the body, and you've got to get Hakenan's body off the table before the enemy get their hands on him. That is your mission objective. Normally, you would ask the Orcs for help, but if word gets out that you lost these documents, then you'll be hanged.
Mission Briefing Two: While wandering around the countryside, your mind has returned to thoughts of the comforts of home. Bier, bier and more bier; it has haunted your dreams, keeping you awake at night. The nearby town of Sticks has good hotels, and you and Schumaker have decided to treat yourself to aquick holiday. However, the awful truth is that you've got no money. You are totally broke. Then, as luck would have it, you spot Colonel Oswold Pebblekettle and his men marching towards the same town. He is carrying his umbrella as always, and you think that if you could steal it from him, then you'd be able to get enough for a round of drinks if you pawned it. You mission is to steal the umbrella and exit off the Northern table edge. To steal the umbrella requires you to defeat Oswold in Melee combat,and instead of inflicting a wound, you can steal the 'brolly. Beware though; he guards that umbrella with his life...
~
Player Four - The Ogre
You are Lieutenant Sven Hassle, an Officer in the Hunvarian Ogres. You are waiting for the arrival of your new recruits, who'll need training in the arts of war when they arrive. However, the fact that you're alone doesn't mean that you don't want to get involved in a good fight. You've heard that there are a few noteworthy characters in the area, such as the esteemed Orc Colonel Pebblekettle, and squashing his thick head would give you great pleasure. You've also heard that the Dwarves have lost some important documents, and that the Elves are quite keen to get their effeminate hands on them. You don't really care about documents and things, but you are quite keen to ensure that no-one else gets what they want without your permission. You are determined to stop the Elves getting hold of the documents, even though they are allied to you by treaties and other pieces of paper.
You are entirely motivated by childish spite. You will do anything to make sure that everyone else's plans go wrong. Assisting you in your work is a large hammer, which you use to crush people who don't let you have your own way.
Mission Briefing One: You've heard that the Krautians are desperately searching for one of their friends, who was carrying some very important documents. They are searching for him at the moment, as are a group of Elves and a band of Orcs. All of them seem very keen to get hold of the body, so you've decided that you're going to take it yourself. After all, if everyone else wants it, you'll take great pleasure in spoiling their fun.
Mission Briefing Two: Several small groups of troops are heading for a bridge over the River Sticks: why, you do not know. What you are certain of is that if they want to cross the bridge, then you must stop them, but it may be quite difficult, as there are alot of them. However, they all seem to be heading for Oswold Pebblekettle, the Orc leader, and he himself seems to be trying to get to Sticks, which is North of the river. You have decided to grab Oswold and carry him off south, back to your headquarters where he can be interrogated properly. This should mean that no-one else gets to do what they want, which is fine by you. To pick up Oswold, you must defeat him in a round of Melee combat. If you succeed (and he is still alive) you may pick him up next Turn (even if he is forced to move as a result of a Morale Check - you get to grab him first) and carry him towards the river. He may do nothing until the Melee Phase, when he may try and struggle free. If he wins the combat, you've lost him and he is free next Turn. If you win, you keep hold of him. Oswold is quite heavy, and inflicts a left column shift tohis bearer 's movement. The Orcs may not fire at you if you're carrying Oswold, but if you are injured or forced to move as a result of a Morale Check, then you drop him. You are also at -4 if engaged in Melee combat with anyone except Oswold while carrying him...
~
Click on the logo above to visit Altrnative Armies webstore.
~
Webmaster's Notes
The "Flintloque International Demonstration Kit" was originally sent out to gaming clubs in the late nineties, this one in particular went out to the Birmingham University Masquerade Society of which I was a member.
I scanned it in and uploaded it to Orcs in the Webbe on the 15th December a wee bit late for the 13th virtual door on our 2020 Advent Calendar.
* Dave Toone recalls Mike Roberts doing most of the rules and background material from the time it was produced so I've given him the byline. If anyone knows any different let me know and I'll update/amend it :)
All the comments in maroon italics or otherwise are mine and have been included to to provide additional information or clarity. I may have also made small changes to grammar and layout but have not marked these.