![]()
"Assassins"
(or "The Rescue"*)
* The scenario name very much depends on how you roleplay your Orcs and your interpretation of their orders...
A Panzerfäuste Scenario by Craig Andrews
A crack squad of Orc Commandos have been chosen for a mission in the perilous mountains of Tôrg Baraz to ensure information sensitive to Branzhûm does not fall into Dwarven hands.
~
Orc’s Introduction
After the recent unexpected success of Operation Unterberg, the Dwarves push into Troglodyte lands, a number of Troglodyte Shamans have been taken hostage by Dwarven forces. They were working on various projects, the details of some being particularly sensitive where the interests of Branzhûm are concerned. We have received word that the Dwarves have assigned one of their chief interrogators, Doktor Ess Bleeds, to extract the information. That information cannot be allowed to fall into Dwarven hands. Our Enigma Boffins have pinned down their probable location. Your mission Captain, is to enter the complex where the Shamans are being held and ensure they cannot pass on any information to the Dwarves.
Dwarves’ Introduction
Operation Unterberg has been a tremendous success in more ways than even the Kaiser expected. Not only have we reclaimed our rightful ancestral lands from the damned Troglodytes but the Orcs belief that we would fail has led to them leaving several Shamans with knowledge of Branzhûm’s magick network ours for the taking. They have been moved to Das Schrein des Bronzendolchens where the Kaiser’s senior Frager des Frage, Doktor Ess Bleeds, will find out what we need to know for the upcoming Operation Walfisch no less. You must ensure the Shamans remain in our hands and able to provide Doktor Bleeds the information he requires upon his arrival.
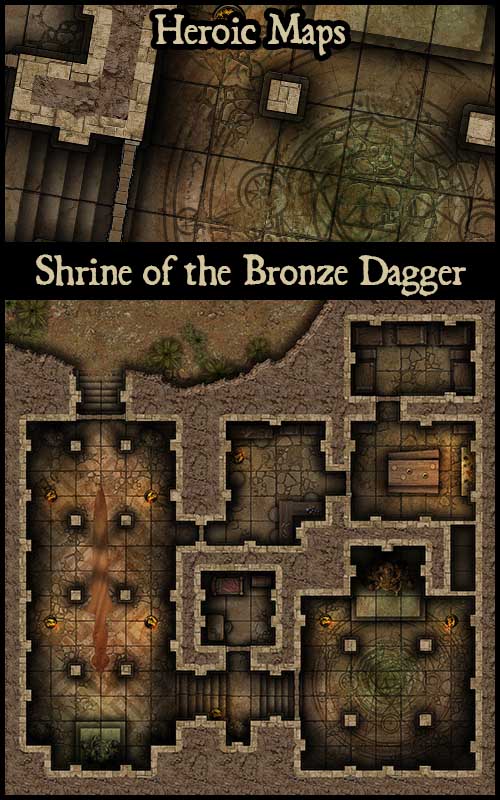
The Map
This scenario was written specifically for use with Heroic Maps excellent map, “Shrine of the Bronze Dagger”. It is currently available for free from WargameVault as a celebration of Heroic Maps 3rd Birthday.
Deployment
The Orcs can deploy anywhere outside the underground complex.
The Dwarves deploy in secret and hidden (see below for the “Hidden Dwarves” rules). If using the suggested map (Heroic Maps “Shrine of the Bronze Dagger”) then you can use a print off of the image above to mark the position of your troops. Simply write the corresponding unit number from the Battle Sheet in the square they are hidden in and circle them to show they are hidden. You can also deploy any Dwarf in plain sight, mark their position on the map and draw a triangle round them.
Scenario Special Rules
Hidden Dwarves
Panzerfäuste Unarmoured contains rules for basic ambushes; I have embellished them slightly for this scenario. Any Dwarf can begin play hidden from sight (their position is marked on the map as detailed above). Any hidden Dwarf can attack as per range/armament dictates (thus immediately revealing themselves) at ANY TIME if they are NOT in the 180 degree frontal arc of ANY Orcs. They get the -2 ambushing an enemy bonus as per the rules. If a hidden Dwarf decides to attack as per range/armament whilst it IS in the 180 degree frontal arc of an Orc it must make an Attack from Hidden Guts roll below. Note that ANY attack reveals the Dwarf for the rest of the scenario.
Attack from Hidden Guts Roll
Result
Critical Success = +1 Guts and attack as planned.
Success = Attack as planned.
Failure = No attack can be made.
Critical Failure = -1 Guts. The intended target can immediately attack their would be ambusher (using either ranged/close combat as range permits)
Spotting Hidden Troops
As an action any Orc can make a spotting check to try and see any hidden Dwarves as per the normal Panzerfäuste Unarmoured rules (p.14), however in this scenario that action must be made in lieu of a Combat Action. For this scenario the action is not limited to 10cm but conducted per room.
Non-Combat Movement
For this scenario if at any point there are no Dwarves on the table then the Orcs may use Non-Combat Movement (i.e. no movement rolls are required). If (when) a Dwarf player wants to interrupt to make a surprise attack they simply announce their intent and follow the rules above. Normal movement must then be followed for both sides until once again no Dwarves remain alive or revealed.
Traps
The Dwarven player receives 1D10 traps to deploy before the game begins. The actual number should be kept secret from the Orc player (if playing without an Umpire this can be achieved by using an online or app based die roller that keeps logs or, my preferred option, rolling a ten sided die and placing an upturned empty Panzerfäuste mug over it to be revealed and confirmed after the game). You should mark on the printed off master map where the traps are (again this is on the honour system if not using a GM but easily done by ensuring the Dwarven player does not change the map after the game begins).
If playing with Panzerfäuste Unarmoured each trap counts as a Burst attack with no modifiers.
If playing with Panzerfäuste 1st Edition then I heartily recommend you use the Negative Vibe Enigma Table on page 32 to determine trap effects.
Barriers/Locked Doors
There are eight doors on the map (well, doorways, the door graphics themselves can be downloaded for free separately from Heroic Maps or you can use Heroquest doors as they’re the right scale for all Heroic Maps). The Dwarven player can choose to have four doors start the game locked. These represent the efforts of the Dwarves to thwart the Orcs after they tripped a hidden wire on their way up the mountain.
Chests
There are three chests on the map. These can be opened by Orcs or revealed Dwarves. If an Orc opens a chest roll 1D6:
1-3 Random Cuisine Item for Your Race
4-6 A Grenade
Dwarves can choose which they wish to find. Note that Chests can be trapped using the rules above, just make sure they are clearly marked on the map.
If not using the recommended map feel free to place some chests around your dungeon layout.
The Shamans
There are three Troglodyte Shamans being held in Das Schrein des Bronzendolchens. They should be marked on the map before play begins.
Doktor Ess Bleeds (aka The Scenario Timer)
You’re probably thinking it’s going to be a doddle for the Orcs. Just walk one stalwart Orc into each room as the others take cover and search for Dwarves. However this is not the case as Herr Bleeds has not yet arrived at Das Schrein des Bronzendolchens and when he does both he and his Braumeisterwache Enigma trained agents will not be best pleased at the presence of Orc Commandos in a supposedly secure Dwarven stronghold. Every search conducted by the Orcs adds 1 ‘Time Token’ to the pot, at the start of each turn after turn 4 roll 1D10. If the rolled result is UNDER the number of Time Tokens then Doktor Bleeds and his Enigma wielding Dwarves arrive.
If you have Panzerfäuste Unarmoured then the Orc Commandos have failed and are captured.
However, if you have the original Panzerfäuste booklet (or Panzerfäuste Skirmish after it is released) things are just getting interesting :) Doktor Bleeds and his Enigma Techniks arrive at the entrance as reinforcements for the Dwarf player.
~
Suggested Squads/Miniatures
The Orcs should be represented by the Orc Commando section. Available here from Hysterical Games.

The Dwarves defending Das Schrein des Bronzendolchens should be represented by the Dwarf Grenadier Section. Available here from Hysterical Games.

Doktor Ess Bleeds is best represented by one of the Dwarven Teckniks in the Dwarf Zinn Mann Brute pack. Available here from Hysterical Games. (He can be represented by any Dwarf if you don’t have access to this excellent set)

And last, but by no means least, the Dwarf Enigma team can be found in the Dwarf Command Set. Available here from Hysterical Games.

~
Solo Play Modifications (Playing as the Orcs)
Hidden Dwarves – After each Orc moves roll 1D10 and add the number of the room entered. If the result is more than 10 then a Dwarf pops out of hiding and attacks. Roll a second D10 and if it matches the first roll then the Orc has triggered a trap.
Use a D8 to determine direction and another to determine distance (i.e. a roll of a 2 and a 4 would mean a Dwarf pops out of hiding 4 squares away directly behind the Orc).
Direction Diagram
Behind the Orc
1 2 3
4 5
6 7 8
In Front of the Orc
Target Priorities
Revealed Dwarves will attack the figure they are most likely to wound/kill, not necessarily the Orc that triggered them being revealed.
Dwarves during Normal Turns
Roll for Initiative as normal. They will move into better cover if able and attack as above.
Author’s Notes
Believe it or not the above scenario came about as a result of playing the original 1988 Laser Squad Commodore 64 game and is based on its first mission. The original introduction is below:
A group of 5 Rebel Troops have landed on the planet CX-1. Their objective is to kill the officer "Sterner Regnix", who is being protected by 6 heavily armed Droids. Regnix is holding Scientists of the MARSEC Corp. hostage, and is trying to extract data that only they know. Infiltrate the MARSEC Corp. building and locate Regnix. Then kill him. You have 20 turns to kill Regnix.
Cut Due to Time/Work Constraints:
Room Descriptions - I had hoped to include these to add a bit of flair and 1970’s D&D feel to this adventure, when an Orc Commando first entered a room the Orc player would read the corresponding text entry. Sadly I only had time to finish one but it’s given me an idea for a follow up that I may look into later in the year. I’ve included it below:
0. Entryway
A narrow path set into in a murky cliff side marks the entrance to the Dwarven complex. Beyond the path, as the terrain opens out into a small cave, lay a series of old worn steps each of which has eroded slightly over centuries of use. You see ancient broken arrows, rusty swords and various remains, all weathered and ravished by time itself.
~
Webmaster's Notes
An Orcs in the Webbe Original! The above scenario was written exclusively for Orcs in the Webbe and was first published on the 1st April 2017.
~